Furnace Won’t Turn On but Fan Works? Complete Diagnosis & Fix Guide
It’s a confusing scenario: You can hear your furnace running. You can feel air coming out of the vents. But the air is ice cold, and the house temperature is dropping. If the furnace fan is working but the heat isn’t, your system has power — but the ignition sequence is failing somewhere along the line.
This specific symptom is actually helpful diagnostic information. Since the blower motor is operational, we can immediately rule out a total power failure, a tripped main breaker, or a completely dead control board. The problem is isolated to the heating side of the system: the ignition components, safety switches, gas delivery, or the signal chain between your thermostat and the burner assembly.
This guide covers every possible cause in depth — from the simple five-second thermostat fix to the advanced control board diagnosis — so you can stop cold air from blowing and get real heat back as quickly as possible. We’ll walk through the entire gas furnace startup sequence, explain exactly what each component does when it fails, and give you a prioritized checklist so you’re not wasting time on unlikely causes.
Why the Furnace Fan Works but Heat Doesn’t
To accurately diagnose this problem, you need to understand how your HVAC system separates the fan function from the heating function at a wiring and logic level. This isn’t just helpful background information — it directly tells you where to look.
Modern forced-air furnaces are designed with two completely independent circuits inside the control board. The blower fan (circulator motor) is powered by one relay, and the ignition/heating sequence is controlled by a completely separate relay set. This separation exists for good reason: if the heating process fails due to a dangerous condition — gas buildup, overheating, or a cracked heat exchanger — the system needs to keep the fan running to flush out fumes and cool down components, even while the burners are off.
So when your thermostat calls for heat, the control board does two things nearly simultaneously. It closes the fan relay (which turns on the blower motor) and it begins the ignition sequence (which involves the inducer, the gas valve, and the ignitor). If anything in the ignition chain fails, the board shuts down the heating attempt but may leave the fan running. This is by design. Understanding how a furnace startup sequence works is the key to finding exactly which component broke the chain.
The Complete Gas Furnace Startup Sequence
Let’s trace exactly what should happen every time your furnace attempts to start. This sequence takes about 30 to 90 seconds from thermostat call to warm air, and a failure at any step produces slightly different symptoms.
Step 1 — Thermostat Sends the Heat Call (0–2 seconds)
When the room temperature drops below your set point, the thermostat closes the circuit on the “W” (Heat) wire, sending a 24-volt signal to the furnace control board. The “G” (Fan) wire may also energize depending on your settings. If your thermostat’s fan is already set to “ON,” the fan may already be running before any heat call is made.
Step 2 — Control Board Receives the Call (2–5 seconds)
The control board validates the signal and checks all safety switch inputs. If any safety switch is open (tripped), the board will not proceed with ignition. The board logs an error code, which you can read by counting the LED blink pattern on the board’s diagnostic light.
Step 3 — Draft Inducer Motor Starts (5–15 seconds)
The draft inducer (a smaller motor in the exhaust flue area) spins up to purge any residual gas from the heat exchanger and create the proper draft for combustion. A pressure switch monitors that the inducer has created sufficient negative pressure before allowing ignition to proceed.
Step 4 — Hot Surface Ignitor Heats Up (15–30 seconds)
The control board energizes the hot surface ignitor (HSI) — a small silicon nitride or silicon carbide element — which heats to approximately 1,800°F to 2,500°F. The board waits for the ignitor to reach operating temperature before opening the gas valve.
Step 5 — Gas Valve Opens (30–35 seconds)
The board sends 24 volts to the gas valve solenoid, which opens to allow gas flow to the burner assembly. The hot ignitor immediately ignites the gas. If ignition doesn’t occur within a few seconds, the board closes the gas valve to prevent gas accumulation.
Step 6 — Flame Sensor Verifies Flame (35–40 seconds)
The flame sensor — a thin metal rod extending into the burner flame — passes a small electrical current through the flame. If the sensor detects flame current (typically 1–5 microamps), it signals the board that combustion is happening. Without this verification, the board shuts off the gas valve within seconds as a safety measure.
Step 7 — Blower Fan Starts on Delay (40–90 seconds)
The main blower fan does not start immediately when burners light. A heat delay timer (or a plenum temperature sensor) waits until the heat exchanger is warm enough to actually deliver warm air. Starting the fan too early would blow cold air through your vents — a normal occurrence for the first 1–2 minutes of each heat cycle.
Any break in this sequence — at any step — produces the “fan blows, no heat” symptom. The key diagnostic question is: exactly when and how does the symptom present? Keep this in mind as we go through each possible cause.
All Common Reasons a Furnace Won’t Turn On but the Fan Works
1. Thermostat Fan Setting: ON Instead of AUTO
This is the single most common cause of “the furnace is blowing cold air” complaints, and it’s completely harmless. If your thermostat’s fan setting is toggled to ON, the blower motor runs 24 hours a day, 7 days a week — completely independent of whether the furnace is heating or not.
Between heating cycles, when the burners are off and the heat exchanger has cooled, the fan circulates room-temperature air. In winter, when your home is already cold, this air feels uncomfortably cold on your skin, even though the furnace itself is working perfectly. Many homeowners interpret this as a heating failure when the only issue is a single setting change.
Go to your thermostat and look for the Fan setting. It will have two options: ON and AUTO. Switch it to AUTO. In AUTO mode, the fan only runs during active heating (and cooling) cycles, then shuts off. If your home immediately starts warming up after making this change, the furnace was never broken — just misconfigured. If you’re not sure how to navigate your thermostat’s settings, our complete guide to thermostat settings walks you through every control option step by step.
2. Clogged or Dirty Air Filter Triggering Safety Lockout
A severely restricted air filter is the second most common cause, and unlike the thermostat setting issue, a dirty filter can cause real damage if ignored. Here’s the chain reaction: a clogged filter drastically reduces airflow across the heat exchanger. With nowhere for heat to escape into the ductwork, the heat exchanger surface temperature climbs rapidly. The furnace’s High-Limit Switch — a thermal safety device mounted directly on the heat exchanger — detects the over-temperature condition and cuts power to the gas valve, shutting down the burners.
Here’s the key behavior that matches your symptom: after tripping the limit switch, the furnace control board keeps the blower fan running at high speed to cool the heat exchanger back down to safe temperatures. The fan blows, the air feels tepid or cold, and the heat never comes back on — even though the furnace has power. Some systems will automatically reset after cooling down; others require a manual power reset.
Pull your air filter out right now. Hold it up to a light source. If you can’t see light through it, it’s overdue for replacement. Standard 1-inch filters should be replaced every 30–90 days depending on household conditions. Thicker 4-inch media filters can last 6–12 months. After replacing the filter, turn off the furnace power for 30 seconds and turn it back on. The limit switch may need up to 30–60 minutes to cool and reset before the furnace will attempt ignition again.
3. Failed Hot Surface Ignitor
The hot surface ignitor (HSI) is a small, fragile heating element — about the size of your finger — that reaches extreme temperatures to ignite the gas burners. On modern furnaces manufactured after roughly 1990, the HSI has replaced the standing pilot light as the primary ignition source.
Ignitors fail in a specific and recognizable way: during a startup attempt, you’ll hear the inducer motor spin up normally, but there’s no ignition “whoosh” from the burners after 30–40 seconds. The control board will attempt the ignition sequence two or three times (depending on the model), then go into a lockout mode. During each attempt, the fan may run, but no heat is produced.
If you remove the furnace’s front panel (usually two screws or a simple lift-and-pull), you can watch the startup sequence directly. When the ignitor energizes, it should glow bright orange-white within 15–20 seconds. If it doesn’t glow at all, it has failed open-circuit. If it glows but gas doesn’t ignite, the problem is either the gas valve or the gas supply itself.
Ignitors are fragile and should never be touched with bare hands — the oils from your skin can create hot spots that cause premature failure. Always handle replacement ignitors with gloves or hold them only by the ceramic base. Replacement is a DIY-achievable task with basic tools, but requires comfort working around gas appliances. See our guide on why your thermostat isn’t starting the furnace for additional ignition chain diagnostics.
If your furnace is older (pre-1990) and still uses a standing pilot light, check whether the pilot flame is burning. If it’s out, follow the relight instructions printed on the furnace label. If it won’t stay lit after relighting, the thermocouple or thermopile that senses the pilot flame may have failed and needs replacement.
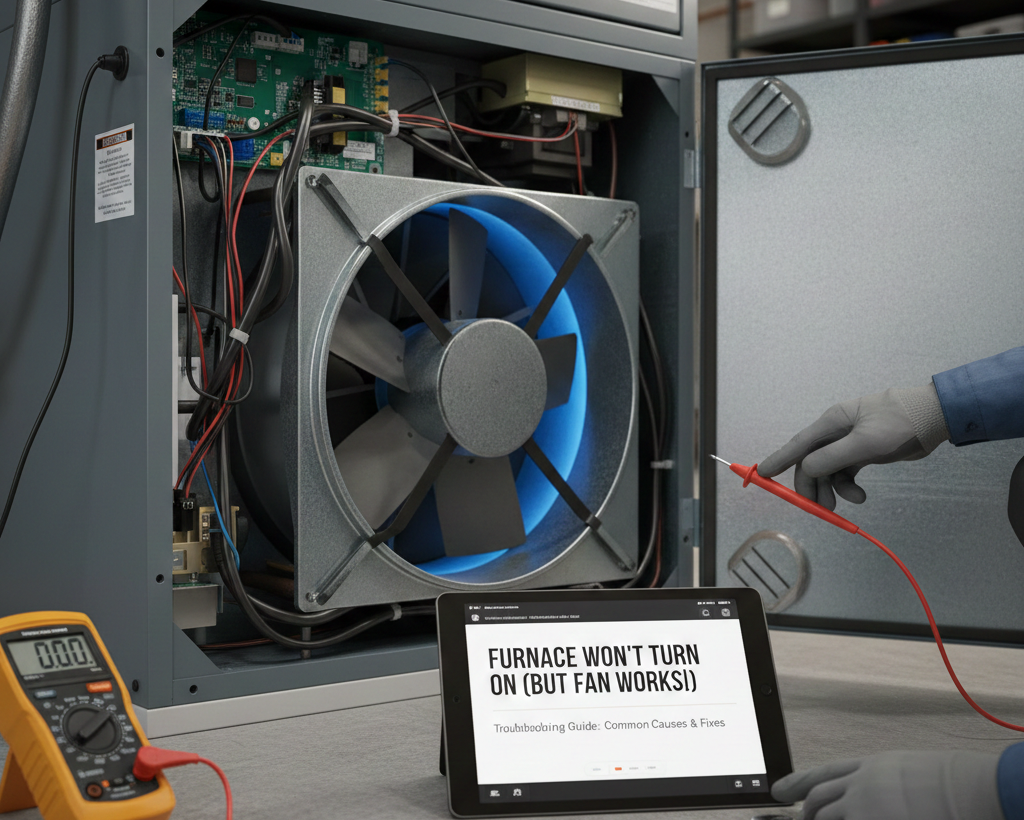
4. Dirty or Corroded Flame Sensor
This is one of the most frequently misdiagnosed furnace problems and one of the easiest to fix. The flame sensor is a thin metal rod (usually with a white ceramic insulator at its base) that sits inside the burner flame. Its job is to detect that combustion is actually happening through a process called flame rectification — the flame itself allows a tiny AC current to flow as DC through the rod, which the control board interprets as confirmation of ignition.
When the flame sensor becomes coated with oxidation or mineral deposits — which happens naturally over years of use — its ability to conduct this micro-current is impaired. The board fires up the ignitor, gas ignites normally, flames burn, but the board never “sees” the flame because the sensor can’t pass sufficient current. The board interprets this as a failed ignition and shuts the gas valve within 5–10 seconds. You’ll notice: the furnace starts, you feel a brief puff of warm air, then everything shuts off and the blower continues to run with cold air.
The fix is remarkably simple: remove the flame sensor (usually one screw), and gently rub the metal rod portion with a light-grit emery cloth or steel wool to remove the oxide layer. Do not use sandpaper (too aggressive) and do not clean the ceramic insulator portion. Reinstall and test. This five-minute cleaning restores full flame sensor function in the vast majority of cases.
5. Tripped or Failed High-Limit Safety Switch
We mentioned the high-limit switch in the context of dirty filters, but it deserves its own section because it can fail independently. The limit switch is a bimetallic or snap-disc thermal safety device designed to open when the heat exchanger reaches a dangerous temperature — typically around 200°F, depending on the furnace model.
In normal operation, the limit switch resets automatically when temperatures return to safe levels. However, if the limit switch is subjected to repeated over-temperature conditions (due to ongoing airflow problems, blocked vents, or short cycling), the mechanical snap-disc can fatigue and permanently stay in the “open” position. A failed-open limit switch prevents any burner ignition, no matter what the actual heat exchanger temperature is — while allowing the fan to continue running.
Testing a limit switch requires a multimeter set to continuity mode. With power off, disconnect the wires from the limit switch and probe both terminals. A functioning (closed/reset) limit switch will show continuity. A failed-open switch will show no continuity. Limit switches are inexpensive components — typically $15–$40 — and are straightforward to replace once the correct part number is identified from the furnace’s wiring diagram.
It’s critical to understand that replacing a tripped limit switch without fixing the underlying airflow problem will simply result in the new switch tripping again. Always resolve the root cause — dirty filter, blocked registers, collapsed ductwork, or short-cycling issues — before or alongside the limit switch replacement. If you’re unsure whether your thermostat is wired correctly for your furnace type, our thermostat-furnace compatibility guide covers the most common wiring scenarios.
6. Gas Supply Interruption or Stuck Gas Valve
If all the ignition components are functioning — the inducer runs, the ignitor glows, the flame sensor is clean — but the burners still don’t light, the problem is likely with gas delivery. There are two distinct scenarios here.
Scenario A: No gas reaching the furnace at all. Before assuming the furnace’s gas valve has failed, check other gas appliances in your home. Turn on a gas range burner or check the pilot on a gas water heater. If other appliances have gas, the main supply to the house is fine. If nothing in your home has gas, contact your gas utility company — there may be a service interruption or the main shutoff may have been closed.
Scenario B: Gas supply is fine, but the furnace valve isn’t opening. The furnace gas valve has an internal solenoid coil that receives 24 volts from the control board to open. If the solenoid fails, the valve stays closed even with power applied. You can test for voltage at the valve’s terminals with a multimeter — if you’re seeing 24V AC during a startup attempt but no gas flow, the valve itself has failed internally. Gas valves should only be replaced by a licensed HVAC technician due to gas safety regulations in most jurisdictions.
7. Furnace Control Board or Wiring Problems
The control board is the brain of the furnace — it interprets thermostat signals, sequences the startup process, monitors safety inputs, and manages all relay switching. Control board failures are less common than the causes listed above but do happen, particularly in older furnaces (10+ years) and in systems that have experienced power surges or persistent over-temperature events.
The most helpful diagnostic tool on the control board is the LED fault code indicator — a small LED (usually red or green) mounted on the board that blinks in specific patterns to indicate fault codes. A board showing a rapid continuous blink typically means power is on and all systems normal. Specific blink patterns (e.g., 3 blinks, pause, 3 blinks) correspond to fault codes described on a sticker inside the furnace door or in the service manual.
Common board-related fault codes that produce the fan-runs-no-heat symptom include: pressure switch stuck open, limit switch open, ignitor failure lockout, and flame sense lockout. If the LED isn’t blinking at all despite power being on, the board itself may have a failed component. A board that powers the fan circuit but not the heating circuit could have a blown component on the heating relay side.
Wiring issues — particularly on the 24-volt control wiring between the thermostat and furnace — can also prevent heat signals from reaching the board even when the fan runs. If you’ve recently installed a new thermostat and are experiencing this problem, it’s worth revisiting the wiring connections. Our complete thermostat wiring guide explains each wire color, terminal label, and common wiring mistakes in detail.
8. Blocked Condensate Drain Line (High-Efficiency Furnaces Only)
If your furnace has an AFUE efficiency rating of 90% or above — identifiable by a white PVC exhaust pipe rather than a metal flue — it’s a condensing furnace. These high-efficiency units extract so much heat from combustion gases that the exhaust condenses into acidic water vapor, which must drain away through a condensate system.
When the condensate drain line becomes clogged with algae, mineral deposits, or debris, water backs up into the system. Most high-efficiency furnaces have a float switch in the condensate pan or drain trap that shuts down the ignition system when water is detected — while leaving the fan operational. The symptom is identical to other “fan runs, no heat” scenarios, but the cause is entirely different.
Check the condensate drain pan (usually a small white plastic pan near the furnace base) for standing water. If water is present, the drain line is clogged. You can often clear it by flushing the drain line with a mixture of white vinegar and water, or using a wet/dry vacuum to suction out the clog. After clearing the drain and removing the standing water, reset the furnace. This is a purely DIY repair that costs nothing and takes about 15 minutes.
9. Pressure Switch Failure
The pressure switch is a small diaphragm-based safety device connected to the draft inducer via a rubber hose. Its function is to verify that the inducer motor is creating sufficient negative pressure (draft) in the combustion chamber before allowing gas to flow. This prevents ignition in conditions where exhaust gases could backdraft into the living space.
Pressure switch failures can happen in several ways. The rubber vacuum hose connecting the switch to the inducer can crack, come loose, or fill with condensate water — all of which prevent the switch from sensing pressure. The switch’s internal diaphragm can rupture or become sticky. In rare cases, the inducer motor itself may not be developing adequate suction, causing the pressure switch to remain open even though the motor is running.
If the furnace’s diagnostic LED is showing a pressure switch fault code, start by inspecting the small rubber hose(s) connected to the pressure switch. Disconnect them and blow them clear with compressed air to remove any condensate. Reconnect and test. If the problem persists, the switch can be tested with a U-tube manometer or a digital pressure gauge to verify it’s opening and closing at the correct pressure differential. Pressure switch replacement is a straightforward DIY repair once the correct replacement part is sourced by furnace model number.
10. Rollout Safety Switch Has Tripped
Rollout switches are small thermal fuses or manual-reset safety devices mounted near the furnace burner assembly. They’re designed to detect flame rollout — a dangerous condition where the burner flames escape the combustion chamber and reach areas they shouldn’t, typically due to a cracked heat exchanger, blocked flue, or restricted combustion air supply.
When a rollout switch trips, it physically breaks the circuit to the gas valve and/or ignition system and will not automatically reset. The fan continues to run, but no heat is produced. Unlike the high-limit switch, a tripped rollout switch is a serious warning indicator — it doesn’t trip from a dirty filter. Rollout means something is genuinely wrong with the combustion process.
You can visually identify a tripped rollout switch — it typically has a small red button that has popped out or a visible mechanical indicator. While you can manually reset it by pressing the button, you should not continue operating the furnace without understanding why it tripped in the first place. A cracked heat exchanger is a life-safety issue requiring immediate professional evaluation. If you notice a rollout switch has tripped, this is one of the clearest indicators that it’s time to call a licensed HVAC technician rather than attempting further DIY diagnosis.
11. Draft Inducer Motor Failure
The draft inducer motor is a small, separate blower that creates airflow through the combustion chamber and exhaust flue before and during the burner operation. It’s distinct from the main blower (circulator fan) that moves air through your ducts. Because the main blower is what you feel at the registers, you won’t notice any difference in register airflow if the inducer fails — the big fan still runs normally. But without the inducer operating, the pressure switch won’t close, and the furnace won’t attempt ignition.
Inducer motor failure is often preceded by a few warning signs: an unusual grinding or squealing noise from the furnace in the weeks before failure, or a burning smell during startup attempts. You can verify whether the inducer is running by listening carefully during a startup attempt — you should hear a distinct “spin-up” sound from the inducer before the main blower kicks in. If the inducer is silent, it may have seized bearings, a failed capacitor, or a burned motor winding.
Inducer motor replacement is a moderate-difficulty DIY repair for someone comfortable with appliance repair, but requires matching the exact replacement part (motor, wheel, and housing specifications vary by furnace model). Many homeowners choose professional service for this particular repair given the cost of the parts and the importance of correct installation.
Symptom-Based Diagnosis: Match Your Exact Behavior
Rather than working through every possible cause sequentially, use this symptom matrix to zero in on the most likely culprit based on what you’re observing.
| What You Observe | Most Likely Cause | DIY Fix? |
|---|---|---|
| Fan runs continuously even when thermostat is satisfied | Fan set to ON (not AUTO) | ✓ Yes |
| Fan runs, no burner noise after 60+ seconds | Failed ignitor, bad pressure switch, or inducer not running | ✓ Partial |
| Burners light for 5–10 seconds then shut off, fan continues | Dirty flame sensor | ✓ Yes |
| Furnace attempts ignition 2–3 times then goes into lockout | Ignitor failure or gas valve problem | ✓ Partial |
| Fan runs at high speed, little heat, then shuts off | Dirty filter causing limit switch trip | ✓ Yes |
| Fan runs, no ignitor glow visible through access panel | Failed hot surface ignitor | ✓ Yes |
| Water pooling near furnace base, high-efficiency unit | Blocked condensate drain | ✓ Yes |
| All other gas appliances also not working | Gas supply interruption | ✗ Call utility |
| LED fault code on control board, no ignition | Control board fault — read code first | ✗ Varies |
| Rollout switch red button visibly popped out | Flame rollout — potential heat exchanger crack | ✗ Call pro |
| Burning or sulfur smell with no ignition | Gas leak / unsafe condition | ✗ Evacuate & call |
Complete Step-by-Step Troubleshooting Checklist
Work through these steps in order. Each one builds on the previous, moving from the simplest and most likely causes toward the more complex. Don’t skip ahead — the most common causes are listed first for a reason.
Verify the thermostat mode is set to “Heat” (not “Cool” or “Off”). Confirm the fan setting is “Auto” (not “On”). Raise the set temperature 5°F above the current room temperature to force an active call for heat. Wait 2–3 minutes for the system to respond. If you’re using a smart thermostat, check the app to confirm the device is sending a heat call. Our guide on recommended thermostat settings for winter covers optimal configuration for every type of system.
Locate the air filter — usually in the return air duct near the furnace, or in a wall/ceiling return grille. Pull it out and hold it up to a light. If light doesn’t pass through easily, replace it immediately with the correct size and MERV rating. After replacing the filter, wait 30–60 minutes and then reset furnace power before testing. A high-MERV filter in a system not designed for it can restrict airflow just as badly as a dirty filter — check your furnace manual for maximum recommended MERV rating.
Find the power switch on the side of the furnace (it looks like a light switch, often on a gray metal box) or locate the furnace’s dedicated circuit breaker in your electrical panel. Switch it OFF, wait 30 seconds, then switch it back ON. This clears the control board’s memory and resets any soft lockout conditions. After resetting, wait 3–5 minutes and observe whether the furnace begins a startup attempt. Many intermittent issues — including minor control board glitches and flame sense lockouts — are resolved by a simple power reset.
Open the lower access panel on your furnace. Look for a small LED light on the circuit board — it will be blinking a pattern. Count the blinks in each group and the pauses between groups. For example, “3 blinks, pause, 1 blink” might indicate a specific fault code. Look up this code in the chart printed inside the furnace door or in the owner’s manual. The fault code directly tells you which safety device triggered the shutdown, saving you from guessing.
Locate the flame sensor rod (a metal rod protruding into the burner area, attached by a single screw with a wire connector). Turn off furnace power first. Remove the mounting screw, disconnect the wire, and slide the sensor out. Use a fine emery cloth or steel wool to gently polish the metal rod until it’s bright and shiny. Avoid touching the rod with bare fingers after cleaning. Reinstall and restore power. This is one of the highest-return DIY repairs for the symptoms described in this article.
With the lower access panel removed (and the upper panel either removed or held open), initiate a heating call from the thermostat and watch the ignitor. It’s typically a small element visible near the burner manifold. Within 20–30 seconds of the inducer starting, the ignitor should glow bright orange-white. If it doesn’t glow at all, it has failed and needs replacement. If it glows but no ignition occurs, the gas valve or gas supply is the issue. For older systems with a pilot light, verify the pilot is lit and the flame is steady blue.
If your furnace exhausts through white PVC pipe, check the condensate trap and drain pan for standing water. Locate the small plastic trap assembly (usually near the base of the unit) and the drain line leading to a floor drain or condensate pump. If you see water in the pan or the trap, flush the drain line with a vinegar/water solution and clear any blockages. Also check the condensate pump (if installed) by pouring a small amount of water into it manually to verify it pumps correctly.
Locate the manual gas shutoff valve on the gas supply pipe leading to the furnace — it’s typically a ball valve with a handle. Verify the handle is parallel to the pipe (open) rather than perpendicular (closed). Test another gas appliance to confirm gas is flowing to the house. If the furnace-specific shutoff was accidentally closed (perhaps during maintenance or a renovation), simply turning it back to the open position may resolve the entire issue immediately.
Listen carefully during a startup attempt. Do you hear a small motor spin up (the inducer) in the first 5–15 seconds before the main blower starts? If there’s complete silence and the main blower just runs without any inducer activity, the inducer motor has likely failed. If the inducer runs but the furnace still doesn’t ignite, inspect the small rubber vacuum hoses connected to the pressure switch(es) on the furnace. These hoses crack with age and when they do, the pressure switch stays open. Squeeze them gently to check for cracks, and inspect all connection points.
Locate the rollout switches — small circular devices with a visible button, mounted near the burner assembly or heat exchanger area. If any red reset button is visibly popped out, do NOT simply reset it without understanding why it tripped. Rollout tripping is a symptom of a serious combustion problem, most commonly a blocked flue or cracked heat exchanger. Call an HVAC technician before restarting the furnace. For safety guidance on furnace health monitoring, our article on how smart thermostats improve home safety explains modern monitoring features that can alert you to these conditions early.
What You Can Fix Yourself vs. When to Call a Professional
Knowing where to draw the line between DIY and professional repair is important for both safety and cost efficiency. Some repairs are straightforward and genuinely safe for a careful homeowner. Others involve gas lines, high-voltage components, or potential structural damage that absolutely require a licensed professional.
✅ Safe to DIY
- Changing thermostat fan setting from ON to AUTO
- Replacing the air filter
- Power resetting the furnace
- Cleaning the flame sensor rod
- Clearing a blocked condensate drain
- Relighting a pilot light (following label instructions)
- Replacing rubber pressure switch hoses
- Reading and looking up LED fault codes
- Replacing a hot surface ignitor (if comfortable with the task)
- Testing limit and rollout switches with a multimeter (for diagnosis)
🔧 Call a Licensed HVAC Tech
- Any gas smell or suspected gas leak
- Replacing or testing the gas valve
- Cracked heat exchanger diagnosis or replacement
- Rollout switch tripped — requires combustion analysis
- Replacing the inducer motor assembly
- Replacing the control board
- Carbon monoxide detector alarms
- Furnace more than 15 years old with repeated failures
- Any work requiring permits in your jurisdiction
- Diagnosing intermittent failures you can’t replicate
Repair Costs: What to Expect in 2025–2026
Understanding the cost range for each type of repair helps you make informed decisions about whether to DIY, hire a technician, or consider replacing an aging furnace entirely. The costs below reflect national averages for parts and labor in 2025–2026. Regional labor rates can vary significantly — urban areas on either coast typically run 20–40% higher than these averages.
As a rule of thumb for older furnaces: if the repair cost exceeds 50% of the cost of a new furnace and the unit is over 15 years old, replacement is often the better long-term financial decision. Modern high-efficiency furnaces (95%+ AFUE) can reduce heating bills by 20–30% compared to older standard-efficiency units, improving the economics of replacement. Our detailed furnace replacement cost guide covers all the variables in the repair-vs-replace decision.
Preventive Maintenance to Avoid Future Failures
The most frustrating aspect of most furnace failures is that they’re entirely preventable with routine maintenance. A furnace that receives annual professional service and regular DIY upkeep between visits will reliably operate for 20+ years. One that’s ignored typically starts experiencing the kinds of failures described in this article within 8–12 years.
Annual DIY Maintenance Tasks
At the start of each heating season — typically September or October in most of North America — run through this maintenance checklist before you need the furnace to work reliably:
Replace the air filter. Even if it doesn’t look dirty, start each heating season with a fresh filter. The cost is minimal and it prevents the most common cascade of furnace failures. Consider switching to a quality 4-inch media filter if your system can accommodate one — they last longer and maintain airflow better than 1-inch fiberglass filters.
Clear and test the condensate drain. If you have a high-efficiency furnace, flush the condensate drain with a vinegar-water solution to prevent algae buildup before it becomes a blockage. Test the condensate pump (if installed) by pouring water into the collection pan manually.
Check and clear all supply and return registers. Walk through your home and verify that all supply vents and return grilles are open and unobstructed. Furniture, rugs, drapes, and storage items frequently end up blocking registers during the off-season. Every blocked register reduces system airflow and increases the risk of limit switch tripping.
Test the thermostat. Before winter arrives, test your thermostat by setting a heat call and verifying the furnace starts normally. This is the time to discover a failing thermostat battery or a dead system — not on the coldest night of the year. Our guide on whether your thermostat can be upgraded can help you assess whether it’s time to modernize your control system. If your thermostat is showing signs of age, learn how to tell if you need a new thermostat before the heating season starts.
Test your carbon monoxide detectors. Press the test button on all CO detectors. Replace batteries. If your detectors are more than 5–7 years old, replace the entire unit — the electrochemical sensors degrade over time and may not respond to low-level CO exposure.
Check the exhaust flue. Inspect the metal or PVC exhaust pipe from the furnace to the exterior termination point. Look for disconnected joints, obstructions, and the exterior termination to ensure birds or small animals haven’t built nests in it during the warm months. A blocked flue is one of the primary causes of rollout switch tripping and CO buildup.
Annual Professional Maintenance (Tune-Up)
In addition to your DIY checklist, schedule a professional furnace tune-up every 1–2 years. A qualified HVAC technician performing a thorough annual maintenance visit should complete the following:
Combustion analysis (measuring CO and CO2 in the flue gas to verify safe and efficient combustion), heat exchanger visual inspection using a camera or mirror for cracks, cleaning the burner assembly and flame sensor, measuring the ignitor’s resistance to predict failure before it happens, checking and lubricating the blower motor bearings, measuring electrical amperage draw on all motors, testing all safety switches for proper operation, checking gas pressure at the valve, and inspecting the heat exchanger for signs of cracking or corrosion. A professional tune-up typically costs $80–$150 and can prevent hundreds or thousands of dollars in emergency repair calls — or more critically, can catch a cracked heat exchanger before it becomes a CO safety hazard.
Smart Thermostat Features That Help Prevent Problems
Modern smart thermostats offer several features that can help you catch furnace problems early — often before they result in a cold house. If your current thermostat is older, upgrading to a smart model adds both convenience and diagnostic capability. Many smart thermostats now monitor runtime patterns, detect unusual heating cycles, and send alerts when the system takes longer than normal to reach the set temperature — which can indicate a developing restriction or component issue.
Some advanced models like the Ecobee Premium include air quality sensors that monitor particulate levels, which can provide early warning of combustion issues. Our review of the Ecobee Premium’s air quality and VOC monitoring features explains these capabilities in detail. For homeowners interested in home safety integration, our guide on how smart thermostats improve home safety covers integration with CO detectors, smoke alarms, and occupancy monitoring.
Regardless of which thermostat you use, setting up thermostat home/away scheduling properly ensures your furnace isn’t running unnecessarily when the house is empty — reducing wear and unnecessary heating cycles. And if you ever need to check on your heating system remotely during travel, a smart thermostat with remote connectivity gives you that capability from your smartphone.
When to Call an HVAC Technician
While changing a filter, cleaning a flame sensor, or resetting a tripped pressure switch hose are DIY-friendly tasks, certain situations require a licensed professional — both for your safety and to protect the equipment.
- Gas Smell: Never troubleshoot gas leaks yourself. Evacuate and call the gas utility.
- Rapid Cycling (Short Cycling): If the unit turns on and off every 1–3 minutes, there may be a serious airflow or sizing issue.
- No Ignitor Glow Despite Power: If the ignitor doesn’t glow, replacement involves fragile high-temperature components.
- Control Board Diagnostic Light Off Completely: No LED activity at all despite power being confirmed suggests a board-level failure.
- Rollout Switch Tripped: This indicates possible flame rollout or heat exchanger compromise — requires professional combustion analysis.
- CO Detector Alarm: Any carbon monoxide alarm requires immediate evacuation and professional HVAC inspection before the furnace is restarted.
- Furnace Over 15 Years Old with Multiple Failures: At this point, replacement economics often outweigh continued repair investment.
- Smell of Burning Plastic or Electrical Odor: Can indicate wiring damage or control board component failure — stop using the furnace immediately.
When calling an HVAC technician, be prepared to share the furnace make and model (on the data plate inside the furnace), the LED fault code blink pattern you observed, and the sequence of symptoms you noticed. This information significantly reduces diagnostic time and can save you money on the service call. Many reputable HVAC companies now offer diagnostic calls where the technician identifies the problem and provides a written estimate before any repair work begins — this is the standard you should expect.
If your system is aging and you’re wondering whether a repair is worth it, check out our comprehensive HVAC system replacement cost guide for 2026 to understand full replacement costs and efficiency improvements available in modern systems.
Frequently Asked Questions
Why Is My Furnace Blowing Air but Not Heating?
The most common reason is that the thermostat fan setting is on “ON” instead of “AUTO,” causing the fan to run continuously even when the heat is off. Other frequent causes include a dirty flame sensor (causing the burners to shut off after a few seconds), a clogged air filter triggering the high-limit safety switch, or a failed hot surface ignitor that can’t light the burners. Check the thermostat setting first — it’s a free, 10-second fix that solves this problem in a large percentage of cases.
Can a Bad Thermostat Cause the Fan to Work but No Heat?
Yes. If the thermostat fails to send a signal specifically to the “W” (Heat) wire but keeps the “G” (Fan) wire energized, you will get fan-only operation. This can happen due to a failing thermostat, incorrect wiring after a thermostat replacement, or a dead battery reducing voltage below the relay trigger threshold. Check our guide on smart vs. programmable thermostats to ensure your device is correctly configured and compatible with your system. If your thermostat is clicking but the furnace isn’t starting, see our dedicated article on why the thermostat clicks but won’t turn on.
Is It Safe to Run the Furnace Fan Without Heat?
Yes, running only the blower fan is safe. It helps circulate air and filter dust throughout the home, but it won’t raise the temperature. Running the fan alone typically costs only a few cents per hour in electricity. The blower motor is a completely separate circuit from the heating components and can operate indefinitely without any risk. However, if you’re running the fan because the heat isn’t working, you should diagnose and fix the heating issue rather than relying on the fan long-term during cold weather.
How Much Does It Cost to Fix a Furnace That Blows Cold Air?
Cost depends entirely on the cause. Changing the thermostat setting or replacing a dirty filter costs nothing or under $40. Cleaning a flame sensor is a DIY task with virtually no cost. A professional flame sensor replacement runs $80–$200. Ignitor replacement typically costs $150–$300. A new control board or gas valve can range from $400 to $900+ depending on the furnace model and labor rates in your area. Always get a written estimate before authorizing any repair work.
How Do I Reset My Furnace When It Won’t Heat?
Locate the power switch on the side of the furnace (resembles a standard light switch) or find the furnace circuit breaker in your electrical panel. Turn it off and wait 30 seconds before turning it back on. This clears the control board’s error memory and resets safety lockouts caused by minor faults. After resetting, wait 3–5 minutes and observe whether the furnace begins a normal startup. If the furnace goes into lockout again after resetting, the underlying fault has not been resolved and requires further diagnosis or professional service.
Why Does My Furnace Start for a Few Seconds Then Shut Off?
If the furnace ignites and produces heat briefly (5–15 seconds) before shutting off while the fan continues running, the most common cause is a dirty flame sensor. The flame lights normally but the coated sensor can’t confirm combustion to the control board, so the board shuts off the gas valve as a safety measure. Clean the flame sensor rod with fine emery cloth as described in this guide. If the burners shut off after 30–60 seconds of normal operation, the high-limit switch may be tripping due to restricted airflow — check your filter and verify all registers are open.
My Furnace Has Been Working Fine — Why Did This Suddenly Start?
Most furnace failures that seem sudden actually develop gradually. A flame sensor oxidizes over years of use until it crosses a threshold where it can no longer detect flame reliably. An ignitor weakens progressively until it fails to reach ignition temperature on a cold startup. A filter that seemed acceptable in October becomes fully clogged by January with heavy use. Sudden apparent failures are often components that were marginal for months finally failing under demanding winter conditions. This is why annual maintenance — especially at the start of heating season — catches these issues before they cause cold nights. Learn more in our guide on why your house feels cold even with the heating on.
Does Fan Running Without Heat Indicate a Cracked Heat Exchanger?
It can, but it’s not the most common cause. A cracked heat exchanger typically causes other symptoms as well: unusual smells (often described as a musty or chemical odor when the furnace first starts), visible soot near supply registers, CO detector alarms, or a yellow/orange flickering furnace flame (it should be blue and steady). The rollout safety switch tripping is a more direct indicator of heat exchanger or combustion problems. If you suspect a cracked heat exchanger, stop using the furnace and call a professional — this is a carbon monoxide safety issue. For context on HVAC replacement costs if a heat exchanger issue is confirmed, see our full HVAC replacement cost guide.


